Tag Archives: crafts

Make a Daffodil Pinwheel

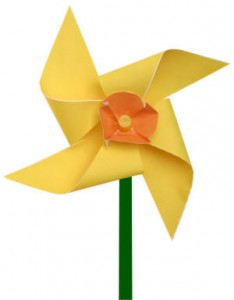
Spring is tomorrow (even if it doesn’t feel like it!) Here is an easy craft to celebrate the start of Spring!

Daffodil Pinwheel Craft

This cute daffodil craft uses the basic pinwheel with a cup on the front to form a daffodil.  pinwheel-daffodil

You can use the templates I’ve provided or design your own using:

  • construction paper and stickers
  • fun foam, or
  • thin pieces of plastic (like one would use for overhead projectors)

Fun foam ones are nice and sturdy, but you’ll need to use straight pins instead of push pins to make them.

Materials:

  • paper
  • printer
  • something to color with
  • pencil with eraser at the end (unsharpened is best, I think)
  • push pin or straight pin
  • optional:  a small bead (like a pony bead)
  • optional:  green paint

Instructions:

  • Optional:  paint your pencil green so it looks like the stem of a flower.
  • Optional:  you can print the B&W template on yellow paper.
  • Take the circle and crimp it along the lines to make an orange cup shape.
  • Fold the rectangular template piece on the dashed line to make a square decorated on both sides.
  • Glue the square together so you have a square decorated on both sides.
  • Cut on the diagonal dotted lines (don’t cut all the way into the middle).
  • Bend each corner to the center dot, but don’t crease your folds.
  • Place the cup in the middle of the pinwheel.
  • Push a pin through the center into the eraser of a pencil (don’t push it super tight)
  • Optional:  put a bead in between the eraser and the paper … some people find it spins a bit better this way… I’ve never noticed the difference (maybe it’s the type of pencil eraser?  I use fresh, unsharpened school pencils)
  • Place it in a vase or pot and decorate your springtime table.

Template:

templates

Mardi Gras Fun With Kids

March 8 Mardi Gras

Mardi Gras, French for “Fat Tuesday” marks the end of Carnival and the beginning of the Christian fasting of Lent.  The biggest Mardi Gras celebration in the US is in New Orleans, Louisiana.  Rio de Janeiro in Brazil also has a huge celebration.  Find a Brazilian au pair in your cluster and ask her to tell you all about it.

Make Mardi Gras Pasta Necklaces

Coloring pasta is easy to do and gives kids something bright and beautiful to work with. Once the pasta is colored and dried, necklaces can be made by stringing on yarn.

colored pasta necklace

Supplies for Colored Pasta:

  • Dried Pasta – any pasta works, but for stringing you will need tubed pasta. I used macaroni, penne, and wheels.
  • Food coloring
  • Rubbing alcohol
  • Plastic baggies
  • Paper towels
  • String or Yarn

Place your dried pasta in a zip plastic baggie. Pour in 3-4 drops of your food coloring. Pour in 1 Tablespoon of Rubbing Alcohol. Now seal the bag and shake it all together. Make sure each piece of dried pasta gets coated.

Pour your colored pasta out on paper towel lined trays. Food coloring can stain, so be careful. You’ll want it completely dry before you start to work with it again, as you don’t want any color to drip. I put mine out in the sun to dry faster.

Get out your string or yarn and cut the length of a necklace for your child. Then tie a knot at one end, big enough that the pasta will stay there. I like to tie pasta in my knotted end so the others won’t fall off. I also like to put a little tape around the top of the string so it won’t fray as you string. 

Have your child string on pasta, all sizes and shapes. You can introduce patterns or do counting with your child.  Once they’ve hit the end of their string, tie the two sides together for a necklace around your child’s neck.

Make Mardi Gras Paper Plate Masks 

PaperPlateMask5

Supplies for Masks:

  • Paper plates
  • Color construction paperPlastic baggies
  • Markers and/or crayons
  • Glue
  • Stickers
  • Glitter
  • Craft feathers
  • Hole punch
  • String


Cut a paper plate in half (you can make two masks per plate this way).

Cut eye holes in the half plate.

Shape the mask by cutting around the edges–scallops, points, curves or whatever suits you. Be sure to cut a curved groove between and beneath the two eye holes for the nose.

Place a line of white glue around the eye holes and along the edges of the mask. If you want, you can also create swirls or other patterns with glue on the mask.

Sprinkle glitter on top of the glue while it is still wet. Allow the glue to dry.

Decorate the mask as you see fit once the glue is dry. Use markers to color the white paper plate; glue feathers, beads or cut-out construction paper shapes to the mask; or add anything else that might make the mask colorful and festive.

Punch one small hole on each side of the mask and tie a string into the holes.


Suffolk Au Pairs Raise Money for Southampton Fresh Air Home Camp for Disabled Kids

AP craft fair 004Saturday, June 19 our cluster had a booth at the Southold Craft Fair.  We sold international food made by the au pairs, sold crafts we made, taught kids about their cultures, handed out Au Pair in America brochures and had a wonderful time.  All funds raised go to the Southampton Fresh Air Home Summer Camp for Disabled Children.  Thanks to all who contributed time, effort and bought our crafts, food and raffle!!