Tag Archives: activities for kids

Puppets!

Puppet - Jodimichelle
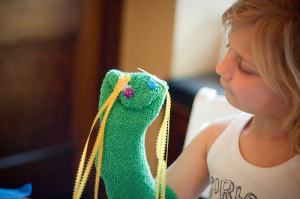
Puppets are a wonderful way to enjoy art and drama and to develop language skills. They can be used with all ages of children. The youngest children can watch you perform and talk to the puppet. Starting at about age 3 the children can help make the puppets and put on simple ‘shows.’ You can make a puppet from almost anything…socks, paper bags, Popsicle sticks, magazines…use your imagination.

Photo: Jodimichelle

Scratch Pictures

Click here for more informaiton on FirstPalette.com

Click here for more information on FirstPalette.com

This is a fun art project for children ages 7 and up. You need paper, crayons (make sure you have a black one), and a paper clip. Take one crayon and rub it over a section of the paper. Use the flat side of the crayon and rub hard. Take another color and do the same to another part of the paper. Cover the entire paper with different colors of crayon. Now, take the black crayon and color over all the other colors until the whole paper is black. With a paper clip or coin, draw a picture by scratching through the black crayon. The other colors will show through where the drawing is scratched.

Driving and keeping children happy in the car

5591761716_57cf063d96Keeping children happy in the car can be challenging. One helpful approach is to engage them in car games – the safety of their car seat or seat belt.

Alphabet Game- ages 3 and up

Children who can identify letters and can easily see out the window of the car can play this game. One child starts with A and has to find a word on a sign visible from the car with the letter A. The next child has to identify the B, and so on.

Photo: epSos.de

International Drum Month

8503154320_15c4903630
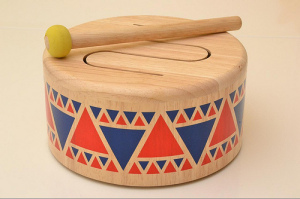
Use an empty coffee can or oatmeal container as a drum and bang on it along with some lively music.

~Make a drum!

Here are instructions (from http://www.pbskids.org) for a drum experiment for school age children. Younger children like to use a coffee cans or pots as drums.
1. First get a container that you think will make a good drum, like a metal bowl or an oatmeal container.
2. Put the double-sided tape all the way around the container 2 inches from the top.
3. Cut 2 pieces of shrink-wrap big enough to cover the tape on the container. Then, push it onto the tape.
4. Tape the edges of the shrink-wrap with masking tape so it’s really secure.
5. Now blow-dry the shrink-wrap with a blow dryer set on hot. This shrinks the plastic and makes a very tight drum. Be sure you don’t put the end of the blow dryer to close to the plastic, or it will melt.
6. Once it’s really tight, bang your drum.

Photo: Thomas Kohler

October is National Pizza Month

pops.final

Click here to find fun pizza recipes like these “pizza pops” on kidspot.com

Pizza is easy and fun to make and can be a nutritious meal for the children and is easy to make at home.

You will need a ready-made pizza dough or a ready-made crust, shredded mozzarella cheese and a jar of pizza sauce.  First the dough or crust goes on a cookie sheet or pizza pan. Then spread the sauce, add the other toppings, and last of all, sprinkle the cheese. Bake as directed for the crust. Be careful, and keep the children away from the oven as the oven must be very hot to make a nice crusty pizza.

If you want to get a little fancier and try these pizza pops. Click on photo for recipes.

Click here for a coloring page where kids can draw in toppings and make their own pizza.

More kid friendly recipes here

Fall Begins

As the weather cools and the leaves start to change color it is apple-picking season in most parts of the United States.  Try these simple apple recipes, no matter where you get your apples:

  • Applesauce is very simple to make. Remove the core and quarter the apples. If you leave the peel on during cooking it will give the applesauce a pink color. When the apples are very soft, remove any peel that is left, mash the pulp or put it through a sieve. Add sugar if needed.
  • Try making Dried Apple Rings. They can be used as a nutritious snack. Peel, core and slice apples into 1/8 inch rings (Macintosh or Golden Delicious apples work best). Dip each ring into a mixture of lemon juice and water to help the apples keep their color. Pull a piece of string through the center of each ring and hang in a dry, warm place. They take 1-2 weeks to dry and become chewy.

Photo: (left) Brian Richardson- (Right) Alessio Maffeis

ABC’s of Winter Fun

A is for Art – try drawing, painting or gluing
B is for Baking – bake a dessert together for dinner
C is for Clay – Use non-hardening clay or play dough to shape and mold
D is for Dance – put on a lively tape
E is for Exercise – be sure to get some everyday
F is for Friends – invite some over
G is for Greenhouse – find a local greenhouse to visit to enjoy the sights and smells
H is for House – make a playhouse from a large appliance box
I is for Ice skating – take the children to a local rink
J is for Jigsaw puzzle – be sure to pick one that isn’t too difficult
K is for Kitchen science – try a safe experiment
L is for Library – borrow some new books
M is for Movie – make one with a video camera, or watch one
N is for Necklace – make one out of cereal or macaroni
O is for Origami – learn to make simple paper creations
P is for Puppets – socks make easy and fun puppets – put on a show!
Q is for Quiet Time – everyone needs some of this
R is for Reading aloud – choose a good book and a comfortable place to sit
S is for Seeds and Suet – put out food for the birds and watch them eat
T is for Tent – make one from old blankets and chairs
U is for Unplugged – do a day with no TV
V is for Variety – try something new everyday
W is for Walk – take one in any weather (be sure to dress appropriately)
X is for Xylophone – make your own with glasses, water and a metal spoon
Y is for Year – make a calendar or scrapbook to remember the year
Z is for Zoo – visit the animals

Wright brother’s first flight

Orville and Wilbur flew their plane for 12 seconds in 1903. Make paper airplanes with the children and see if they can fly that long!

http://d33y93cfm0wb4z.cloudfront.net/Lana/OMO/Activity_images/iStock_000016808383XSmall_346x210.jpg

If you’ve forgotten how to make a paper plane, click here and you’ll find 10 great paper plane designs with how-to video tutorials

From www.kidspot.com:

Making paper planes

Make a paper plane that can actually fly with these easy instructions. This traditional paper-plane design is a simple paper craft for kids that will then lead to another fun activity for kids: flying a paper aeroplane.

What you need:

  • 1 x A4 sheet of paper

Activity:

  1. Fold the paper along the width and then unfold it to create a crease.
  2. On one side of the paper, fold each corner in towards the center, to the point where the inside edges are even with the center-line crease.
  3. Starting at the very tip of the point, fold the paper over on each side so the inside edges line up with the center crease.
  4. Turn the paper airplane over and fold it in half along the center-line.
  5. Fold the first wing with the line of the fold running nearly parallel to the center-line of the plane.
  6. Fold the second wing the same as you did the first.

The plane is now ready to fly!