Tag Archives: craft

Spider Web Snacks

Spider Web Snacks

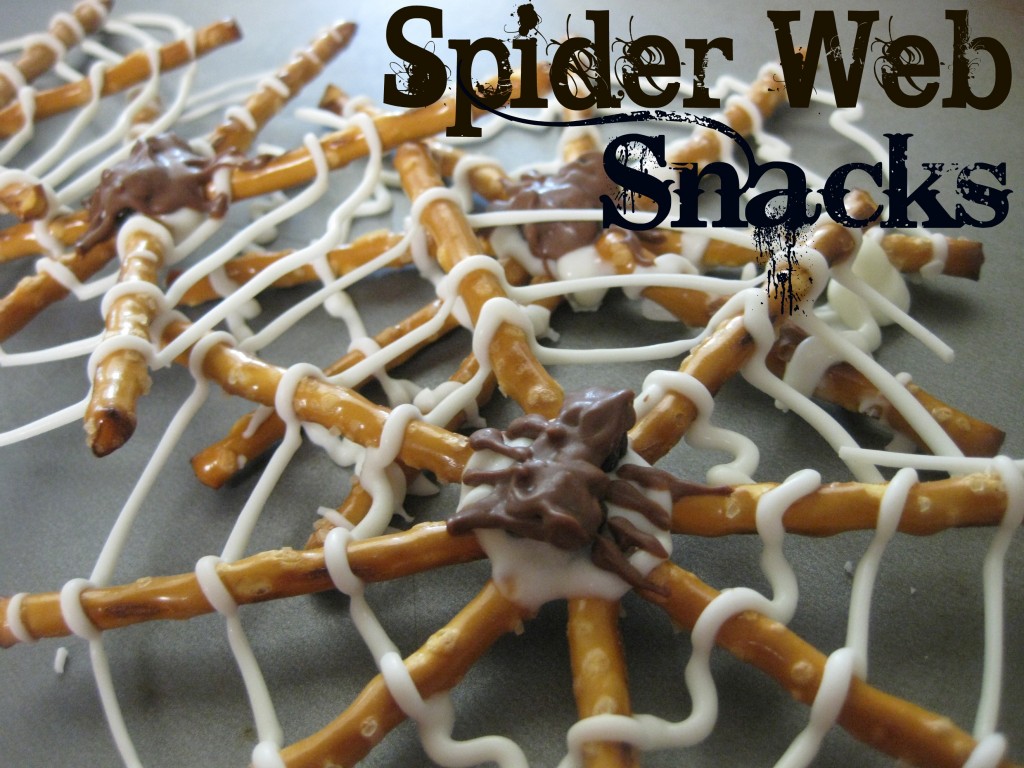
Here is a fun Hal­loween treat of the sea­son. Who knew eat­ing spi­der webs could be so yummy?! These are easy, inex­pen­sive, and cute!

Ingre­di­ents:

– pret­zel sticks
– white chocolate/bark candy coating
– choco­late (baker’s, candy coat­ing, or chips would prob­a­bly all work)
– raisins
– bag­gie or pas­try bag
– wax paper

Direc­tions:

Lay out your pret­zels on the wax paper in “star­burst” arrange­ments of 6 or 8 pret­zels (it’s a good idea to put it on a cookie sheet for trans­port stability).

After melt­ing your white chocolate/bark coat­ing, place in a bag­gie and cut the cor­ner off (or use a pas­try bag).  Start pip­ing your choco­late in the mid­dle of the pret­zel arrange­ment, mak­ing sure to coat all the pretzels.
Con­tinue pip­ing out­ward around the pret­zels, until you have a web.  Then, place two raisins in the mid­dle for the body of the spider.
Melt your reg­u­lar choco­late and pipe over the raisins.  I found that the spi­ders turned out bet­ter when I piped the legs of the spi­der first and then did the body.  Place in the fridge for a few min­utes until the choco­late is hard.  Then, gen­tly peel back the wax paper.…and eat!

Spooky Tree Centerpiece

Spooky_Tree_centerpiece

What You’ll Need:

  • Black Plastic Cauldron
  • Floral/Craft Foam
  • Glass Gems, Rocks, or Stones
  • Halloween Tinsel Garland
  • Plastic Skeleton Garland
  • Twigs from Your Yard
  • Paint & Paint Brush (Optional)
  • Glittery Bat Ornaments
    Easy Step-by-Step Directions:
  1. First, gather a few spooky-looking twigs from your yard.
  2. Place the floral/craft foam in the center of the cauldron and fill the empty space around the foam with glass gems, rocks, or stones. This will anchor your foam and provide stability for your tree.
  3. Stick the twigs from your yard securely into the foam…make sure you push them far into the foam for stability. Arrange twigs into your desired tree shape. If you want to paint your twigs black or another color, do that next. They will be easier to paint standing upright in the foam. Set the tree aside to dry.
  4. Once the twigs are dry,cover the stones at the base of the tree with Halloween tinsel garland, then place the skeleton garland on top of the tinsel and position the skeletons however you wish.
  5. Decorate the tree with more skeletons, Halloween creepy creatures, or handmade glittery bat ornaments.

Witche’s Broom Treat Bag

2012_witch_broom_treat_bags

What You’ll Need:

  • Brown Paper Lunch Bags
  • Scissors
  • Rubber Bands
  • Ribbon, String, or Yarn
  • Sticks (from your yard)
  • Candy

  • Easy Step-by-Step Directions:
  1. Create the broom’s bristles by cutting one of the paper bags in 1⁄2″ strips from the very top (where the bag opens) to the very bottom, stopping at the part of the bag that sits flat on the table top.
  2. Lay the cut paper bag flat on the table.Place the uncut paper bag on top of the cut paper bag, so that the bottoms are sitting exactly on top of one another.
  3. Fill the uncut paper bag about one-quarter full with the candy of your choice.
  4. Put the stick in the middle of the uncut paper bag.
  5. Bring the loose strips of the cut paper bag up and around the sides of the uncut paper bag. Holding both bags tightly against the stick (about half way up) secure with a rubber band.
  6. Tie a piece of string, yarn, or ribbon tightly around the paper bags, concealing the rubber band. Trim excess paper bag.

Use bags as favors/place cards at your next Halloween or Thanksgiving party. Simply print your guests names on cardstock, cut out, and attach to the fronts of the bags!

Top Ten Outdoor Activities for Fall

Top Ten Outdoor Activities for Fall

Summer is over, and in many places the air is turning colder. As the weather changes be sure to take advantage of what the fall season has to offer. Even if you don’t live in a place that sees a lot colorful leaves, there are fun family-friendly ways to get outdoors this fall:

• Go apple picking. Sure, most of us can get apples year-round from the grocery store, but there’s nothing quite like orchard fresh apples, picked straight from the tree during harvest season. That crunchy, tangy, sweet apple flavor is at its peak during this time of year. Many commercial orchards will let you pick your own. It’s not only fun, it’s also a great way to show kids where their food comes from. Get extras for canning applesauce, or making pies. When you’re done, warm up with a delicious mulled cider.

• Go on a nature hike. Bring along a field guide to identify different kinds of trees. Look for wildlife collecting food for winter. Explain to kids how animals are starting to fatten up and grow thick, protective winter coats. Watch for migrating birds.

• Collect fall leaves. Press them into books or preserve them in glycerin (recipe below*). Paste them onto handmade paper to create greeting cards, or glue them between two pieces of wax paper to make an attractive sun catcher. Go lightly on the glue, or substitute crayon shavings to add color; use a warm iron to melt the shavings and hold the paper together.

• Take a hayride. Many farms offer hayrides during the fall. This is a great way to kick back and enjoy nature with smaller kids who may not be up for a long walk.

• Visit the pumpkin patch. Don’t buy your Halloween pumpkin from the grocery store. Go straight to the source. Kids will love wandering around the patch to pick out the perfect pumpkin. Choose a couple of big ones for jack-o-lanterns, and grab a few smaller ones for painting or general household decorations. Smaller pumpkins make great additions to fall centerpieces. Roast the seeds in your oven with a sprinkling of tasty spices, and grab a few to make pumpkin pies.

• Visit a corn maze. Many farms earn extra income for the winter by turning their cornfields into large mazes. Test your directional sense, and get some fresh air in the process. Corn mazes are fun or all ages.

• Stuff a scarecrow. Dig out an old shirt and overalls, and stuff it with leaves until firm. Add a pumpkin head (from your trip to the pumpkin patch) and you’ve got a great fall decoration.

• Fly a kite. The gusty, brisk air makes autumn a great time for flying kites. Buy one from the store, or make your own from two long sticks, strong paper, and string.

• Have a bonfire. Invite some friends over for a backyard bonfire. The chill in the air makes fall the perfect time to sit together by the warmth of a blazing fire with a nice warm mug of cocoa or cider. Be sure to get any necessary permits from your town first.

• Make a leaf pile and jump in!

*Bring a mixture of two parts water to one part glycerin to a boil in a saucepan, and pour the solution into a heat-safe container. Drop in the leaves, and gently submerge them with a wooden spoon. Place the container in a cool, dark place for up to seven days. Remove the leaves when you begin to notice a slight change in their coloring, and blot them dry with a paper towel

Easter Sunday in the United States.

Quick Facts

Easter Sunday March 31 ,2013.

Easter Sunday is an important day in the Christian church calendar because it celebrates Jesus Christ’s resurrection, according to Christian belief.

Many Christians celebrate Jesus Christ’s resurrection on Easter Sunday. The Easter date depends on the ecclesiastical approximation of the March equinox.

What do people do?

Many churches hold special services on Easter Sunday, which celebrate the Jesus Christ’s resurrection after his crucifixion. Many people also decorate eggs. These can be hard boiled eggs that can be eaten later, but may also be model eggs made of plastic, chocolate, candy or other materials. It is also common to organize Easter egg hunts. Eggs of some form are hidden, supposedly by a rabbit or hare. People, especially children, then search for them. In some areas, Easter egg hunts are a popular way for local businesses to promote themselves or may even be organized by churches.

Background

In Pagan times, many groups of people organized spring festivals. Many of these celebrated the re-birth of nature, the return the land to fertility and the birth of many young animals. These are the origins of the Easter eggs that we still hunt for and eat.

In Christian times, the spring began to be associated with Jesus Christ’s crucifixion and resurrection. The crucifixion is remembered on Good Friday and the resurrection is remembered on Easter Sunday. The idea of the resurrection joined with the ideas of re-birth in Pagan beliefs.

10 Easy Easter Crafts for Kids

http://www.parenting.com/gallery/easy-easter-crafts-for-kids

Valentines Day-February 14th

Globe Heart

Valentine’s Day is February 14th!

Au Pairs give loving care to their host families every day.  Au Pair in America has provided 27 years as the world’s most experienced intercultural  childcare program.

Au pairs become full-fledged family members, sharing a cultural exchange experience that often leads to a lasting relationship with the host family.

Au Pairs come to the USA for cultural exchange and to provide childcare to busy families.  They stay for one year and then have the option to extend for a second year.  Au Pairs are 18 to 26 years old when they arrive in the USA.  Please check out www.aupairinamerica.com for more information!

Au Pairs will be making Valentine cards with their host children.  Here’s how:

What you’ll need:

  • 8.5 x 11 construction paper or card stock in various colors and/or patterns easy-homemade-valentines-kaboose-craft-photo-350-fs-IMG_9049_rdax_65
  • Valentine and/or heart stickers
  • Scissors
  • Pinking shears (optional)
  • Glue stick or white craft or school glue
  • Glitter (pink, red, white)

How to make it:

  1. Begin by cutting a piece of construction paper or card stock into four equal pieces.
  2. Fold quartered paper in half to make a card.
  3. For the easiest version, appropriate for preschoolers, use stickers to decorate or cut out hearts from a different color of construction paper or card stock to glue onto your cards. Experiment with different patterns, florals look great contrasted with stripes on a solid background.
  4. Younger children love glitter! Use a bottle of glue to “draw” on a heart or phrase (such as “Be Mine”). Sprinkle glue generously with pink, red or white glitter and let dry over night. Tap off excess glitter when completely dry.
  5. For the older set, let them use pinking sheers to cut out heart shapes and glue onto cards. Again, use contrasting patterns and colors to create a charming design.
  6. Once glue is dry, cards may curl up a little. Place cards between the pages of a heavy cookbook or phone book and leave over night.

Valentine's Day

Happy Hanukkah!

Wishing all who celebrate this holiday a very Happy Hanukkah!

Hanukkah started on Saturday evening and will end on Sunday, December 16th.

Hanukkah is a Jewish holiday celebrated for eight days and nights. It starts on the 25th of the Jewish month of Kislev, which coincides with late November-late December on the secular calendar. In Hebrew, the word “hanukkah” means “dedication.” The name reminds us that this holiday commemorates the re-dedication of the holy Temple in Jerusalem following the Jewish victory over the Syrian-Greeks in 165 B.C.E.

The Hanukkah Story

In 168 B.C. the Jewish Temple was seized by Syrian-Greek soldiers and dedicated to the worship of the god Zeus. This upset the Jewish people, but many were afraid to fight back for fear of reprisals. The Syrian-Greek emperor Antiochus then made the observance of Judaism an offense punishable by death. He also ordered all Jews to worship Greek gods.

Jewish resistance began in the village of Modiin, near Jerusalem. Greek soldiers gathered the Jewish villages and told them to bow down to an idol, then eat the flesh of a pig – both practices that are forbidden to Jews. A Greek officer ordered Mattathias, a High Priest, to follow their demands, but Mattathias refused. When another villager stepped forward and offered to cooperate on Mattathias’ behalf, the High Priest became outraged. He drew his sword and killed the villager, then turned on the Greek officer and killed him too. His five sons and the other villagers then attacked the remaining soldiers, killing all of them. Mattathias and his family went into hiding in the mountains, where other Jews wishing to fight against the Greeks joined them. Eventually they succeeded in retaking their land from the Greeks. These rebels became known as the Maccabees, or Hasmoneans.

Once the Maccabees had regained control they returned to the Temple in Jerusalem. By this time it had been spiritually defiled by being used for the worship of foreign gods and also by practices such as sacrificing swine. Jewish troops were determined to purify the Temple by burning ritual oil in the Temple’s menorah for eight days. But to their dismay, they discovered that there was only one day’s worth of oil left in the Temple. They lit the menorah anyway and to their surprise the small amount of oil lasted the full eight days. The holiday is observed by the kindling of the lights of a unique candelabrum, the nine-branched Menorah, one additional light on each night of the holiday, progressing to eight on the final night. The typical Menorah consists of eight branches with an additional raised branch. The extra light is called a shamash and is given a distinct location, usually above or below the rest. The purpose of the shamash is to have a light available for use, as using the Hanukkah lights themselves is forbidden.

For fun and educational activities for children go to http://www.apples4theteacher.com/holidays/hanukkah/

Directions to play the Dreidel game. Play for Hershey kisses, a great way to have fun with the kids when they are home from school! http://www.apples4theteacher.com/holidays/hanukkah/dreidel-game.html

Happy Hanukkah!

Turkey Nut Holder

Turkey Nut Holder Thanksgiving Craft

Total Time Needed:
1 Hour

An egg carton in clever disguise, these individualized cups hold a nutty snack for young gobblers.

Materials
  • Pencil
  • Egg carton
  • Scissors or X-acto knife
  • Tempera paint (brown or yellow)
  • 4-inch pipe cleaner
  • Pushpin (optional)
  • 2 googly eyes
  • Colored feathers (available at craft stores)
  • Glue stick
  • White paper
  • Toothpick
  • Marker
Instructions
  1. Draw a cut line around one of the cups in the egg carton. Then, cut along the line (a parent’s job) and paint the cup.
  2. Fold the pipe cleaner in half and twist the ends together to form a wattle. Push the exposed wire through the top of the turkey’s beak until one third of the pipe cleaner is through the hole. (Tip: Stick a pushpin through the carton first.) To keep the wattle from slipping out, bend down the inserted end.
  3. Glue on the googly eyes and feathers.
  4. To make a name tag flag, cut out a strip of white paper. Cover one side with glue, then place a toothpick in the middle and fold the paper in half so the toothpick is glued inside. When the paper is dry, write on a name, then stick the toothpick through one side of the turkey, and the holder is ready to fill with nuts.

Halloween Ghost Jug Decorations

spirit-jugs-halloween-craft-photo-260-FF1007TREATA13

Stationed on a walkway or porch, these homemade lanterns will extend a ghostly greeting and good-bye to all your holiday visitors.

Materials
  • Clean plastic gallon milk jugs
  • Black permanent marker
  • Craft knife
  • String of 50 clear low-wattage holiday lights
Instructions
  1. Draw ghost eyes and mouths on the jugs. Tip: Leave the caps on while you do this, so the jugs don’t dent.
  2. Use the craft knife to cut a half-dollar-size hole in the back of each jug (a parent’s job).
  3. Arrange the ghosts near each other and string the lights between them, stuffing several bulbs into each of the jugs.

Halloween

Jack-o'-Lantern_2003-10-31Ghouls and goblins will take over the night.
But even scary creatures need to be safe and celebrate Halloween right.

Halloween’s greatest hazards aren’t vampires and villains, but falls, costume mishaps and automobile collisions.
The Red Cross wants your family to have a safe Halloween so we’re providing these tips:

The Lucky 13:

1. Map out the route that you plan to roam, so adults are assured you will find your way home!
2. From the bravest of superheroes to the noblest of knights, everyone should remember to bring their flashlights!
3. If you visit a house where a stranger resides, accept treats at the door and, please, don’t go inside.
4. When you get ready to put on your disguise, use face paint instead of masks, which will cover your eyes.
5. Always remember, before you embark, to wear light-colored clothing to be seen in the dark! (And remember to use reflective tape, even on bikes, and brooms and the edges of your cape!)
6. Whether you walk, slither or sneak, do it on the sidewalks and not in the street.
7. As you roam through the neighborhood collecting your treats, please look both ways before crossing the street! (And speaking of streets, the corners are the place for trick or treaters to cross no matter their pace.)
8. Wigs, capes and costumes are flammable attire, so avoid open flames to prevent a fire!
9. Use a glow stick instead of a candle so your jack-o-lantern isn’t a safety gamble!
10. You may fly on a broom or a space ship from Mars, but please be on the lookout for drivers in cars! (Between parked cars is no to hide, be sure that you’re seen whether you’re a clown or a bride.)
11. Monsters and zombies should stay off the lawn, and only visit homes with their porch lights turned on!
12. You may be dressed as a werewolf, a cat or a frog, but be cautious around strange animals, especially dogs.
13. For additional information on how you and your family can be prepared for emergencies on Halloween or on any day of the year, please visit www.RedCross.org