Tag Archives: crafts

Valentine’s Day Activities.

Valentine’s Day (February 14) is a time of love, friendship, giving, and caring. Americans use Valentine’s Day as an opportunity to tell friends and family how much they care.  Children usually exchange cards at school.

Are you looking for Valentine’s day activity and craft ideas?

Look no further…  Au Pair in America has a Pinterest pinboard devoted to Valentine’s Day:

APIA Valentine’s Day Pinboard

Photo: Clever Cupcakes (Flickr)

Crayon Valentines

Re-cycled Crayon Valentine’s

If you’re looking for the easiest way to make heart-shaped crayons, you’re best bet is heart shaped silicone molds that you can place directly into the oven.  Here’s a great tutorial for that.  I, unfortunately, did not have silicone molds at home.  I had plastic heart molds (and, by golly, we were going to use them!!).  So, I scoured the internet for alternative methods and picked the easiest things I could that we had on hand.  Here’s what we ended up with:

Ingredients:
Lots of  broken crayons (Update:  Be sure to use Crayola’s instead of generic crayons for the best results)
Plastic heart-shaped candy molds
Glass Jars  (old pickle, jam, relish, etc. jars)
Chop Sticks (for stirring)
Pot-holders

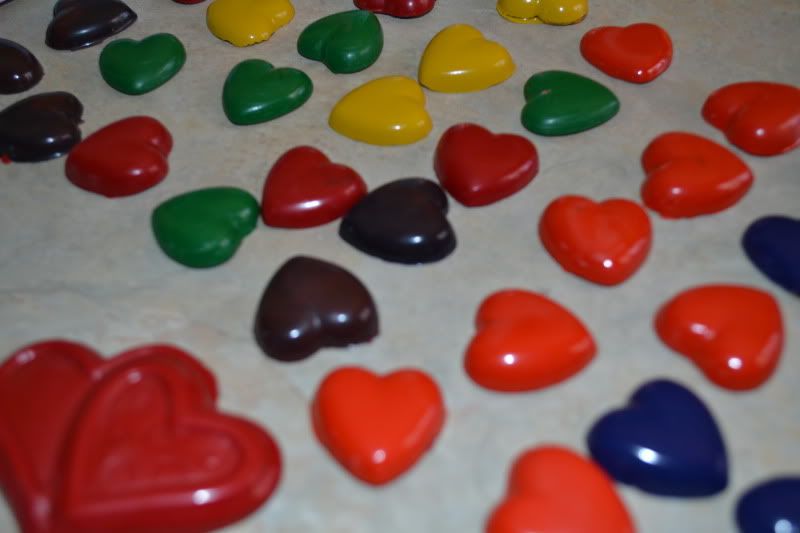
1.  The kids got to work pulling out all the broken crayons from our big tub of crayons.  Then they sorted them by color and began unwrapping them.  (I used a knife to score the sides of the wrappers to make this easier.)

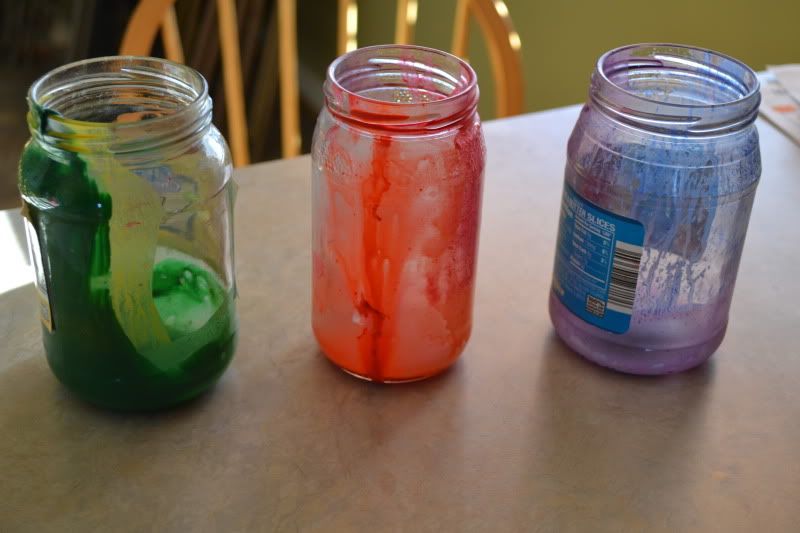
2.  Then, we put each color into a different jar.  (One site recommended Dixie cups for this part and another said that aluminum cans in a water bath on the stove could be substituted.  We did not have either of those.)  I only had 3 jars so we did the lighter colors first and kept like colors together.

3.  Microwave each jar for 3-5 minutes, stirring occasionally with the chop sticks.  Caution:  THE JARS WILL BE HOT!!!  Be sure to use a pot-holder or towel to remove them from the microwave.

4.  Once melted, pour the wax into the candy molds and let settle for a few minutes.  Then, they can safely be transferred to the freezer.  After a few minutes in the freezer, they will pop right out of the molds.

*We did one color at a time since we only had two molds and colored pictures in between colors.

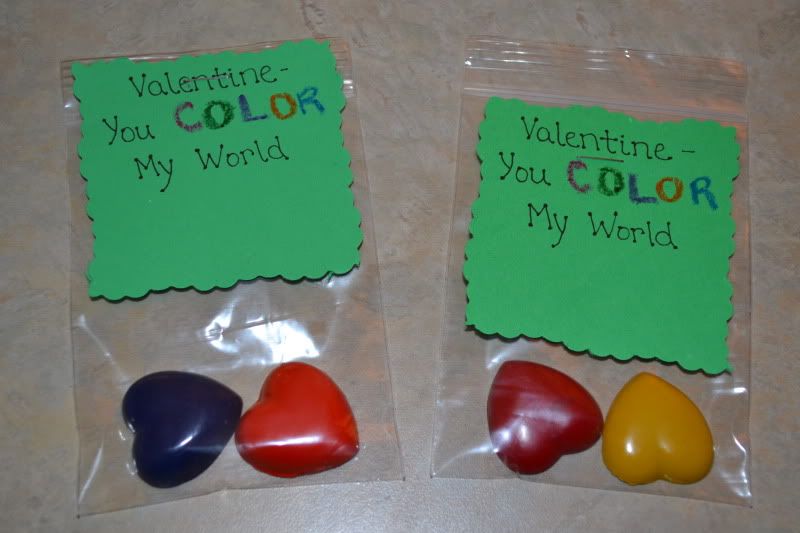
5.  Then, we bagged up a few crayons for each child in small ziplock bags found in the bead & jewelry section of any craft store and added a little note that read “Valentine, You Color My World.”

Super cute!!  Of course, next year I think we’ll just invest in the silicone molds ?

Teacher Workday Ideas…fun/educational activities

10e10f0d7df35d9d531899ea33faf446

A teacher workday is a delightful opportunity for you and your child to enjoy the simple pleasures of personal time, to share activities together, to go deep with ideas and feelings. But as every teacher and parent knows, the trick is to find enough things for your child to do so she or he doesn’t get cabin fever.

Magic mood-changers
Teachers have discovered that this time of year is perfect doing short activities that can quickly change the mood of the day. These mini-events also grab children’s attention and engage them in teachable moments. Studies have shown that the brain remembers the first and last part of a lesson better than the middle. That is why it is better to offer short episodes of learning where there are more beginnings and ends and fewer “middles”!

Here a few favorite mini-events teachers use to fight cabin fever in the classroom. You can try them at home too.

Music and movement games. Can’t play fair outside? Do it inside! Put on some of your favorite music and do a cooperative version of musical chairs. The object of the game is to get as many friends and family on the chairs as possible. Nobody is OUT! Each time one chair is removed, everyone has to work together to get each other on the chairs. More indoor games to try include: a kitchen utensil marching band, Simon Says, two-minute aerobics, yoga, and jumping rope without a rope.

Winter picnic. Is the wind blowing outside your door? You can still have a picnic. Collect the picnic basket, the beach towels, tablecloths, and folding chairs and spread them out in the living room! Involve your child in planning, preparing, and sharing the sandwiches and snacks for the event. Set everything up, put on some warm music, and invite the entire family. Don’t forget your sunglasses. The best part: no ants!

Art projects. Art is always a great calming activity for children. If you are willing to get a bit messy, you and your child can share some fun moments together. Make food-coloring ice cube paints to share on a roll of paper: Fill ice cube tray with different colors and place a Popsicle stick in each for handles. Freeze. Your child can rub the ice cube “brushes” on the paper and watch as the colors “paint” and mix together!

Or, for a change of pace, try this in reverse. Instead of freezing the paint, freeze the paper. Wet plain white drawing paper and place on a sheet of aluminum foil. Place in the freezer overnight. Have watercolors ready to paint on the paper as soon as you take it out of the freezer. It will melt fast and create some interesting designs.

Quiet reflection. We are such an active culture, and children’s lives are getting more and more crowded by after-school activities that require them to be on the go most of the time. Taking a moment to not do is almost unheard of. Yet, it is an essential part of creating peace both inside and out. Through quiet perception games, children can learn to calm their minds and bodies quickly and easily. Try this: Invite your child to sit in comfortably. Then say: “Without talking, I want you to look around the room and notice something that interests you. Look at it carefully and notice everything you can about it without touching it.” (Pause.) “Now pretend you can touch it. Think about how it would feel if you could touch it.” You can do just one object or invite your child to find something else to look at this way. This game is not only successful at home but is wonderful in a crowded waiting room or on line in the grocery store!


Happy Labor Day!

Labor Day
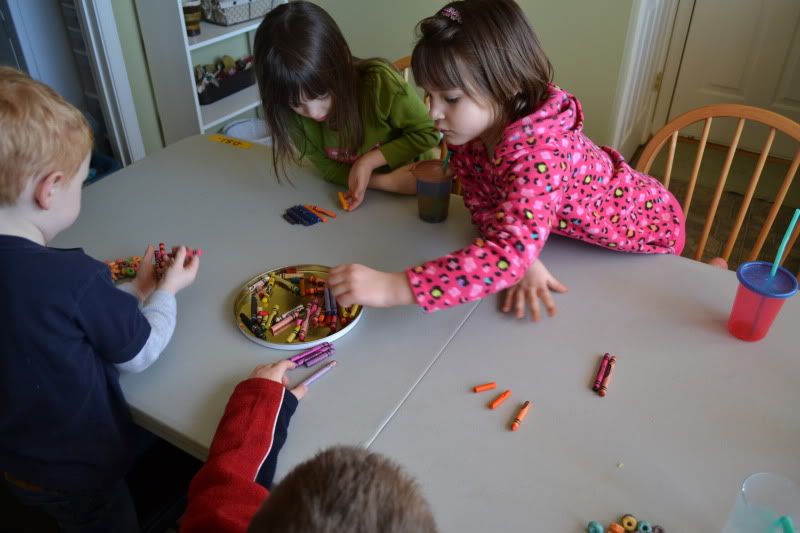
Here are some interesting fact about the upcoming Labor Day holiday that you may not know.  Below are some tips on what you can do with your children to celebrate from cooking recipes to coloring pages.  Use this time to engage is some cultural sharing with your families.

The Workman’s Holiday ~ Dedicated in honor of the worker, Labor Day is also known as the “workingman’s holiday”. The holiday is dedicated to all workers in the United States in respect and appreciation for the work they do in or outside of the home, union or non-union, big companies and small companies and au pairs too. As long as you work somewhere at something, this holiday is for you! It is a day to celebrate your contribution to American working life and the work you do.

The First Labor Day ~ The first Labor Day was celebrated in New York City on September 5, 1882 and was started by the Central Labor Union in New York City. In 1884, it was moved to the first Monday in September where it is celebrated today. Labor Day quickly became popular and one state after another voted it as a holiday. On June 28, 1894, the U.S. congress voted it a national holiday.

The End of Summer ~ Labor Day is also viewed as the official end of summer. While the Fall Equinox is still a couple of weeks away, kids go back to school and summer vacations are over. This day is celebrated with a long weekend off from work and union sponsored parades. Many people celebrate this weekend with one last picnic. It is also the date that many people close up the swimming pool, and put away the boats.

Was it McGuire or Maguire? Either Peter McGuire or Matthew Maguire is the Creator of Labor Day. Peter J. McGuire, was an active labor organizer. He was also general secretary of the Brotherhood of Carpenters and Joiners and a co-founder of the American Federation of Labor. He was believed to be the first to suggest a day be dedicated to American workers and their accomplishments. Matthew Maguire however, was secretary of the Central Labor Union in New York in 1882 and many believed that he proposed the holiday in 1882.

So What do Americans eat on Labor Day? Picnics and barbecues are popular ways  to celebrate Labor Day.  Old standards are hamburgers, corn dogs, coleslaw, potato salad  corn on the cob, baked beans and sliced tomatoes. Finish up with sliced watermelon, apple or blueberry  pie and freshly churned ice cream.  Sound good?

Want to try a recipe?

Click here for Labor Day coloring pages: http://www.apples4theteacher.com/coloring-pages/labor-day/

Click here for Labor Day short stories for children: http://www.apples4theteacher.com/holidays/labor-day/short-stories/

Valentine’s Day.

Valentine’s Day is a time of love, friendship, giving, and caring. Americans use Valentine’s Day as an opportunity to tell friends and family how much they care.  Children usually exchange cards at school.

Are you looking for Valentine’s day activity and craft ideas?

Look no further…  Au Pair in America has a Pinterest Pinboard devoted to Valentine’s Day:

APIA Valentine’s Day Pinboard

valentine's day heart

Happy Thanksgiving!

shayagency.com

shayagency.com

Thanksgiving Day, is a holiday celebrated in the United States on the fourth Thursday in November. It has officially been an annual tradition since 1863, when, during the Civil War, President Abraham Lincoln proclaimed a national day of “Thanksgiving and Praise to our beneficent Father who dwelleth in the Heavens.”  Thanksgiving, a uniquely American holiday, dates back to the first European settlers in North America.  After much hardship, illness and hard work, the Pilgrims were finally able to celebrate a successful harvest which they shared with their Native American friends who had helped them through their difficult beginning in America.  Today this day is set aside to feast and to give thanks-something we can all share, as we too celebrate our cross-cultural friendships.

Some activities to share with the children :

Maple-Nut-Berry Popcorn Balls ( for children ages 3 and older): Add some chopped walnuts and raspberries, blueberries or blackberries. Add enough melted butter to lightly coat popcorn. Stir. Pour maple syrup over the warm popcorn and stir until all the corn, nuts and berries are covered. Shape the sticky corn into balls and place on a plate to refrigerate until the syrup hardens.

Thanksgiving cards and place cards: Fold a piece of paper in half, place a leaf on the inside and close the card. Use a crayon to rub lightly across the front of the card in the area where the leaf is. The shape of the leaf will appear on the outside. Remove the leaf. Write a name on the front for a place card, or a message inside for a Thanksgiving card. Older children might want to make more sophisticated designs using more than one leaf.

Make a chain of paper doll (adults should do the cutting): Fold a piece of paper back and forth over and over again with a width between folds of 2-3 inches. With the paper folded cut out a shape of a person, make sure that the hands and feet touch the fold, but don’t cut through the fold. When you unfold the paper there will be a line of people holding hands. Children ages 3-10 can color the figures to look like Pilgrims(men wore big white collars, belts with buckles, and buckles on their shoes, pants to their knees; women wore white hats and aprons over solid color dresses) or Native Americans (draw feather headdresses and brightly colored geometric patterns on their clothes).

Tree of Thanks: This Thanksgiving tree is bound to become a new holiday tradition.

Trace leaves onto autumn colored craft’s paper and cut out. Punch a hole into the stem of each paper leaf. Measure and cut a 2” length of wire or twine for each leaf. Thread it through the hole and bend the ends to make a hook for hanging. Place the tree branches in a pot or vase. Let the children or/and guests choose a leaf or two and ask them to jot down things that they are thankful for.

Spider Web Snacks

Spider Web Snacks

Here is a fun Hal­loween treat of the sea­son. Who knew eat­ing spi­der webs could be so yummy?! These are easy, inex­pen­sive, and cute!

Ingre­di­ents:

– pret­zel sticks
– white chocolate/bark candy coating
– choco­late (baker’s, candy coat­ing, or chips would prob­a­bly all work)
– raisins
– bag­gie or pas­try bag
– wax paper

Direc­tions:

Lay out your pret­zels on the wax paper in “star­burst” arrange­ments of 6 or 8 pret­zels (it’s a good idea to put it on a cookie sheet for trans­port stability).

After melt­ing your white chocolate/bark coat­ing, place in a bag­gie and cut the cor­ner off (or use a pas­try bag).  Start pip­ing your choco­late in the mid­dle of the pret­zel arrange­ment, mak­ing sure to coat all the pretzels.
Con­tinue pip­ing out­ward around the pret­zels, until you have a web.  Then, place two raisins in the mid­dle for the body of the spider.
Melt your reg­u­lar choco­late and pipe over the raisins.  I found that the spi­ders turned out bet­ter when I piped the legs of the spi­der first and then did the body.  Place in the fridge for a few min­utes until the choco­late is hard.  Then, gen­tly peel back the wax paper.…and eat!

Spooky Tree Centerpiece

Spooky_Tree_centerpiece

What You’ll Need:

  • Black Plastic Cauldron
  • Floral/Craft Foam
  • Glass Gems, Rocks, or Stones
  • Halloween Tinsel Garland
  • Plastic Skeleton Garland
  • Twigs from Your Yard
  • Paint & Paint Brush (Optional)
  • Glittery Bat Ornaments
    Easy Step-by-Step Directions:
  1. First, gather a few spooky-looking twigs from your yard.
  2. Place the floral/craft foam in the center of the cauldron and fill the empty space around the foam with glass gems, rocks, or stones. This will anchor your foam and provide stability for your tree.
  3. Stick the twigs from your yard securely into the foam…make sure you push them far into the foam for stability. Arrange twigs into your desired tree shape. If you want to paint your twigs black or another color, do that next. They will be easier to paint standing upright in the foam. Set the tree aside to dry.
  4. Once the twigs are dry,cover the stones at the base of the tree with Halloween tinsel garland, then place the skeleton garland on top of the tinsel and position the skeletons however you wish.
  5. Decorate the tree with more skeletons, Halloween creepy creatures, or handmade glittery bat ornaments.

Witche’s Broom Treat Bag

2012_witch_broom_treat_bags

What You’ll Need:

  • Brown Paper Lunch Bags
  • Scissors
  • Rubber Bands
  • Ribbon, String, or Yarn
  • Sticks (from your yard)
  • Candy

  • Easy Step-by-Step Directions:
  1. Create the broom’s bristles by cutting one of the paper bags in 1⁄2″ strips from the very top (where the bag opens) to the very bottom, stopping at the part of the bag that sits flat on the table top.
  2. Lay the cut paper bag flat on the table.Place the uncut paper bag on top of the cut paper bag, so that the bottoms are sitting exactly on top of one another.
  3. Fill the uncut paper bag about one-quarter full with the candy of your choice.
  4. Put the stick in the middle of the uncut paper bag.
  5. Bring the loose strips of the cut paper bag up and around the sides of the uncut paper bag. Holding both bags tightly against the stick (about half way up) secure with a rubber band.
  6. Tie a piece of string, yarn, or ribbon tightly around the paper bags, concealing the rubber band. Trim excess paper bag.

Use bags as favors/place cards at your next Halloween or Thanksgiving party. Simply print your guests names on cardstock, cut out, and attach to the fronts of the bags!