Monthly Archives: March 2012

My NYC Half Marathon
Alice Polzin, Au Pair from Germany with Au Pair in America, Watermill, NY
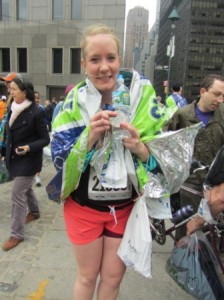
 That feeling to cross the finish line is indescribable. The whole stress drops from me and I have tears in the eyes. My legs are shaking and I have the feeling I can’t move any further but my friends are there, hugging me and I have a medal around my neck. Yes, I’ve made it . I smile. This is an experience what I will never forget!
How everything started …
On the first weekend in November, I applied for the New York City Half Marathon. When I had filled in the application on the internet, I already thought it would not come true. I had to fill in which races I did before and I had nothing to put in. I was worried, but also motivated to give it a try. I didn’t really start with my training at this point because I wasn’t accepted yet. But the day of the lottry was coming closer and I was getting nervous.
When the day of the lottery came I couldn’t stay away from my computer for longer than 10 minutes. I was so excited, checking my online profile everytime it was possible. I also entered in a Facebook group for that race, so I was able to see how people commented that they were accepted and other ones wrote that they didn’t get a chace to run this year. My heart was beating really fast. After a looooong while I could read the word “ACCEPTED”. I was so happy that I jumped on my bed. But I also realized that I have to start running now.
Running support…
 I couldn’t stop telling everyone that I am accepted for the race and immediately my dad who’s a runner made me a run-schedule. But the really big support for the whole time were my friends. Even if they had to work too and everyone has a different schedule they were my personal trainers. Whether with the bike next to me or also running there was always someone with my on the roads and beaches of the Hamptons. Thanks to Ane, Nina, Paulien, Catrin and Eva.
The Day of the race…
 After a short night with two of my support girls in a hotel in Chinatown I woke up with a stomachache. I was so nervous, anxious and thinking that I couldn’t run the whole 13.1 miles. But my friends were all the time with me. They dropped me off in Central Park where the race started. The whole Central Park was crowed, 22 000 runners and their supporters.
 The race started at 7:30 am and I waited in my running group for 40 minutes to cross the start line. These 40 minutes felt like 2 hours! Then I was running in Central Park for like 7 miles and it was amazing! Everywhere people along the edge smiling at your face. I was just running. My friends were waiting for me at mile 6 and I got new motivation after I saw them. The next big “stop” of the race was Times Square and then to the west side and all the way down to Ground Zero.
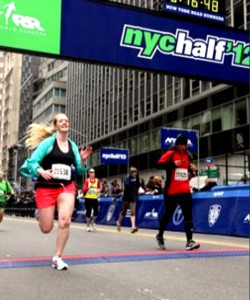
 The finish was Water Street at Maiden Lane. And again were my friends waiting for me. The smile in my face was getting more broadly when I saw the finish line. I crossed the finish line in 2 hours 37 minutes 49 seconds. I am so proud of myself and I’ll never forget that day in my life!

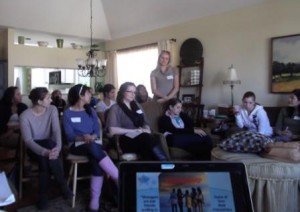
March Cluster Meeting
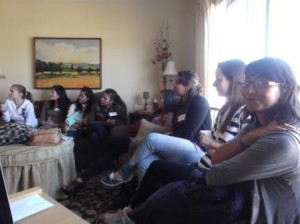 Taxes aren’t much fun, but they have to be done, even by au pairs. On Sunday, March 18th, Cindy Garruba Senior Community Counselor in Suffolk County for Au Pair in America helped the au pairs prepare their tax returns. Cindy handed out the forms, directions and provided the steps to complete the returns provided by Au Pair in America’s Stamford office. Taxes done, they will mail them in on or before the April 17th deadline date!
 Since Spring has sprung early here on Long Island, we reviewed playground safety. Tips on safety can be found on the APIA website http://www.aupairinamerica.com/resources/safety_tips/ . Au Pair in America considers the safety of the children in our au pairs’ care of the utmost importance. The au pairs also viewed a video about playground safety
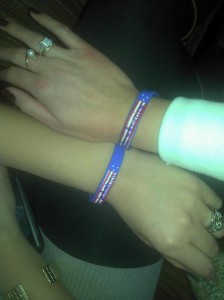
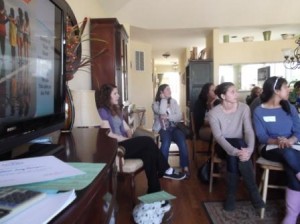 We also shared how important friendship is in the Au Pair program. “Strangers are just friends waiting to happen.” Lifelong friendships are formed as au pairs. We exchanged friendship bracelets to remember to reach out to each other when we need a friend!
Cindy’s Long Island Au Pair Photo Challenge

There are some unique attractions in Suffolk County Long Island to find and for you to take a picture with for your memory books! Get to know Suffolk County better and see some of it’s most unusual places!
My challenge is for you to find as many as you can and email me the pictures.
Each Au Pair who takes a picture of themselves with every attraction on the list will be entered in a drawing for $50! 1 winner
Everyone who enters at least 5 pictures will be entered in a drawing for $25! 2 winners
You must be in the picture wearing your Au Pair in America T-shirt with the attraction!!
All pictures must be emailed to me by May 18th!
Look at the right of this blog under Long Island Info to find out the location and more information about each attraction!
-
Grumman Memorial F-14 Tomcat
-
Hercules Statue
-
Raceway Giant Native American Statue
-
SB Post Office Eagle
-
The Big Duck
-
The Smithtown Bull
-
The Star Gazer
-
Vietnam Veteran’s Memorial at Bald Hill
-
Wick’s Farm Giant Witch
-
Casa Basso Restaurant
Let’s Go Fly A Kite!
We have had so many windy days that I thought you might enjoy kite flying with your host kids! Why not make your own with the children! 
Handmade Kite How-To
Supplies
Downloadable instructions
1 dowel rod- 2 feet long (3/16” diameter)
1 dowel rod- 3 feet long (3/16” diameter)
Pencil
Wood glue
Craft knife
Nylon, plastic, fabric or paper
Tape or glue
Lightweight string or fishing line
Ribbon or repurposed fabric
Kite string (on a spool) or lightweight string and a cardboard roll
Scissors
Instructions
1. Take your 3-foot long dowel rod and measure a foot from the top of the stick, making a mark with your pencil. Center the 2-foot long stick horizontally on top of the longer stick where you made the mark, creating a cross shape.
2. Attach the two dowel rods where they intersect with a couple dabs of wood glue. Once the glue has dried, use your string to weave in and out of the four posts until the two sticks are sturdy. Secure the end of the string with a dab of glue.
3. Use your craft knife to cut a small notch in the end of each point of your kite’s frame. Starting at the bottom notch in the cross, wrap a piece of string or fishing line all the way around, securing it in each of the four notches. Upon reaching the bottom of the cross, tie the string or fishing line into a knot.
4. Once you’ve built the frame of your kite, lay it atop one of the following materials:
5. Trace the outline of the frame onto your material, measure 2” from each of the four sides, and draw a 2” wide border.
6. Cut out your material and make a slit in each of the four corners so the material doesn’t bunch when you fold the border. Lay the material on top of the frame, and wrap the border around the outer string or fishing line of the kite. Use glue or tape to adhere your material of choice in place.
7. Make the kite’s bridle—an arrangement of strings attached to the bottom of your kite that allows it to maneuver. The bridle is also what you’ll tie your kite string to in step 8. To make the bridle, Cut a 3 1/2’ piece of string, and tie one end around the top of the frame. Make a small loop one-third of the way down the string and tie it in a knot. Tie the open end of the string to the bottom of the frame.
8. Tie your kite string or a lightweight string to the loop in the bridle. If using string that doesn’t come in a roll, wrap it around a cardboard roll.
9. To make the kite’s tail, tie a 6’ long piece of string or fishing line to the bottom of the frame. Knot several short pieces of ribbon or strips of repurposed material to the string, each about 8” apart. After completing this step, you’ll be ready to fly!
Flying Your Kite
Tip: If you’re having trouble getting your kite in the air, try letting out a small length of string and begin to run with your kite until it’s lifted by the wind.
Tip: When you’re done flying your kite, consider hanging it as décor. We love the look of a kite hanging in a child’s bedroom. Try making a few kites of different sizes, and display them in a whimsical arrangement.