Tag Archives: au pairs

Spooky Tree Centerpiece


Spooky_Tree_centerpiece

What You’ll Need:

  • Black Plastic Cauldron
  • Floral/Craft Foam
  • Glass Gems, Rocks, or Stones
  • Halloween Tinsel Garland
  • Plastic Skeleton Garland
  • Twigs from Your Yard
  • Paint & Paint Brush (Optional)
  • Glittery Bat Ornaments
    Easy Step-by-Step Directions:
  1. First, gather a few spooky-looking twigs from your yard.
  2. Place the floral/craft foam in the center of the cauldron and fill the empty space around the foam with glass gems, rocks, or stones. This will anchor your foam and provide stability for your tree.
  3. Stick the twigs from your yard securely into the foam…make sure you push them far into the foam for stability. Arrange twigs into your desired tree shape. If you want to paint your twigs black or another color, do that next. They will be easier to paint standing upright in the foam. Set the tree aside to dry.
  4. Once the twigs are dry,cover the stones at the base of the tree with Halloween tinsel garland, then place the skeleton garland on top of the tinsel and position the skeletons however you wish.
  5. Decorate the tree with more skeletons, Halloween creepy creatures, or handmade glittery bat ornaments.

Going Unplugged During Work Hours.

Phones, tablets, and laptops are wonderful tools to stay connected and informed, but we need to be careful not to let them become distractions from real life interactions and most importantly our responsibilities.

Au Pairs – Imagine for a moment that you went to the hospital and you were in the care of doctors and nurses.  How would you feel if those doctors and nurses who were there to care for you were more interested in texting or using their personal computer than caring for you?  How would that make you feel, about yourself and about them?  Would you think that you were getting the treatment you deserved?  Would you feel like paying the bill after your stay?

Life as an au pair, it is a fine balance between employee and family member. You live with your host family and participate with them as a member of the family, but you also have clear responsibilities as a childcare provider. Being a childcare provider is truly one of the most important jobs I can think of, because you are helping to shape our next generation.  What message are you sending them when you would rather interact with a computer than with them? How will they feel about themselves and about you? Children feel as though everything is about them. They will see this as a rejection of them and they will be more likely to act out.

It also poses a safety concern when you are not paying enough attention to the children in your care.  Accidents happen, but when an adult care giver is close by and appropriately supervising the chances of a major injury dramatically reduce.

During work hours, the following would not be considered acceptable:
-Texting*
-Talking to friends on the phone
-Chatting with friends online
-Using Skype or FaceTime
-IMing
-Emailing
-Updating your status on Facebook
-Using Snapchat, WhatsApp or any other app or social media site
-Watching videos on YouTube
-Tweeting on Twitter
-Uploading photos on Instagram
-Anything else on the computer unless it is going to Nickjr.com together with your host children

*you do want to be on the look out for texts from your host parents

Think about this — even if you work 45 hours a week, that leaves you 123 hours per week for all of that other stuff, or about 70 hours (if you are getting the recommended 7-8 hours of sleep per night.)

Host Parents – You need to be clear about what you consider acceptable during work hours to avoid misunderstandings.  Also, please understand that you are dealing with a new generation of people who are very accustomed to being plugged in at all times.  Their intention is not to be rude, they don’t necessarily realize how their actions will be perceived.  Please use this information as an opportunity to begin a dialogue on the issue.

October-Fire Safety Month


Click here to read more Fire Safety Tips on PBS KidsClick here to read more Fire Safety Tips on PBS Kids

Here are some fire safety tips from PBSKids.org. Go over these fire safety tips with your children.

Be Smart

  1. Don’t touch matches. Stay away from lighters and candles, too.
  2. Don’t touch radiators or heaters. Ask a grown-up to turn a heater on or off for you. Don’t stand too close to a fireplace or wood stove, either.
  3. Don’t play with electrical cords. And don’t stick anything into an electrical socket.
  4. Don’t play around in the kitchen. If you want to cook something, be sure to check with a grown-up first.
  5. Don’t put anything over a lamp. Things thrown over a lamp (like blankets or clothing) could catch fire

Edelweiss Hat- Celebrate Germany!

edelweiss hat

Oktoberfest in Germany celebrates the harvest – which ironically end at the end of September.  In Germany, celebrations for Oktoberfest are from September until the first weekend in October.  In the USA,  Oktoberfest is celebrated throughout the month of October (probably so we don’t get confused by the name?).     In honor of our German au pairs who are planning the Cultural Connection this month at our business meeting, here is a craft to do with your kids.

In the region of southern Germany known as Bavaria, you’ll often see men and boys in traditional folk hats graced with a feather or an edelweiss, a delicate Alpine flower. Our paper version of these hats offers both.

To make one, fold the green construction paper in half to make it 9 by 12 inches. Fold the two creased corners toward the center to make two 6-inch right triangles, leaving 3 inches at the bottom. Fold each 3-inch flap in half, then fold up again to form the brim. Cut a flower shape out of the white paper, glue on the yellow circle, and glue it to the hat’s brim. To make the chin strap, punch holes on each side of the hat’s brim, string the elastic through, and knot at each end. For a final touch, stick the feather in the fold of the hat.

MATERIALS

12 x 18-inch sheet of green construction paper
Scissors
3 x 3-inch square of white paper
Glue stick
Yellow paper circle, 1 inch in diameter
Hole punch
2 feet of elastic
Feather

Halloween Ghost Jug Decorations


spirit-jugs-halloween-craft-photo-260-FF1007TREATA13

Stationed on a walkway or porch, these homemade lanterns will extend a ghostly greeting and good-bye to all your holiday visitors.

Materials
  • Clean plastic gallon milk jugs
  • Black permanent marker
  • Craft knife
  • String of 50 clear low-wattage holiday lights
Instructions
  1. Draw ghost eyes and mouths on the jugs. Tip: Leave the caps on while you do this, so the jugs don’t dent.
  2. Use the craft knife to cut a half-dollar-size hole in the back of each jug (a parent’s job).
  3. Arrange the ghosts near each other and string the lights between them, stuffing several bulbs into each of the jugs.

Top Ten Activities for Fall

304381858_b394a4d708

Summer is over, and in many places the air is turning colder. As the weather changes be sure to take advantage of what the fall season has to offer. Even if you don’t live in a place that sees a lot colorful leaves, there are fun family-friendly ways to get outdoors this fall:

• Go apple picking. Sure, most of us can get apples year-round from the grocery store, but there’s nothing quite like orchard fresh apples, picked straight from the tree during harvest season. That crunchy, tangy, sweet apple flavor is at its peak during this time of year. Many commercial orchards will let you pick your own. It’s not only fun, it’s also a great way to show kids where their food comes from. Get extras for canning applesauce, or making pies. When you’re done, warm up with a delicious mulled cider.

• Go on a nature hike. Bring along a field guide to identify different kinds of trees. Look for wildlife collecting food for winter. Explain to kids how animals are starting to fatten up and grow thick, protective winter coats. Watch for migrating birds.

• Collect fall leaves. Press them into books or preserve them in glycerin. Paste them onto handmade paper to create greeting cards, or glue them between two pieces of wax paper to make an attractive sun catcher. Go lightly on the glue, or substitute crayon shavings to add color; use a warm iron to melt the shavings and hold the paper together.

• Take a hayride. Many farms offer hayrides during the fall. This is a great way to kick back and enjoy nature with smaller kids who may not be up for a long walk.

• Visit the pumpkin patch. Don’t buy your Halloween pumpkin from the grocery store. Go straight to the source. Kids will love wandering around the patch to pick out the perfect pumpkin. Choose a couple of big ones for jack-o-lanterns, and grab a few smaller ones for painting or general household decorations. Smaller pumpkins make great additions to fall centerpieces. Roast the seeds in your oven with a sprinkling of tasty spices, and grab a few to make pumpkin pies.

• Visit a corn maze. Many farms earn extra income for the winter by turning their cornfields into large mazes. Test your directional sense, and get some fresh air in the process. Corn mazes are fun or all ages.

• Stuff a scarecrow. Dig out an old shirt and overalls, and stuff it with leaves until firm. Add a pumpkin head (from your trip to the pumpkin patch) and you’ve got a great fall decoration.

• Fly a kite. The gusty, brisk air makes autumn a great time for flying kites. Buy one from the store, or make your own from two long sticks, strong paper, and string.

• Have a bonfire. Invite some friends over for a backyard bonfire. The chill in the air makes fall the perfect time to sit together by the warmth of a blazing fire with a nice warm mug of cocoa or cider. Be sure to get any necessary permits from your town first.

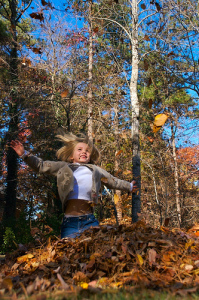
• Make a leaf pile and jump in!

Childproofing.

3281882201_14ba77f870

With shorter days and colder weather, you and the children are probably spending more time inside the house. Please be sure that the house is “childproof” with these simple tips:

  • Children are curious; many small children put everything into their mouths. Be sure no small objects are within the child’s reach.
  • Plastic bags, long cords and very soft pillows can be dangerous to children.
  • If a toy gets broken and has sharp edges, keep it away from children!
  • Be sure that laundry soap and other cleaners are out of reach of the children.
  • Don’t leave any medicines in reach of children, not even vitamins.
  • Keep scissors and knives out of reach.
  • Store the toys that belong to older children out of reach of babies and toddlers.
  • Many cosmetic items and toiletries, such as mouthwash, perfume, nail polish, and hair spray, are poisonous. Keep them out of children’s reach.

Coin Critters.

Practice learning American Coins with your host kids.

coin-critters-games-photo-420-FF1010MATHA10

  • The skills it builds: coin values, addition, and subtraction

    What You Need

  • Coins
  • Paper
  • Marker or crayons
Instructions
  1. Take some coins from your pocket or purse, lay them out on a piece of paper, and have your child draw arms, legs, and other body parts to create a creature.
  2. Then help her total up the value of the coins and write it beside the creature. Add or take away coins to form new shapes, and figure out the new sums.

Caramel Apples


Make some caramel apples with your kids to get into the carnival vibe and enjoy some yummy treats.

applesAll you need are apples, cubes of caramel, and milk!

  1. Remove the stem from each apple and press a craft stick into the top.
  2. Butter a baking sheet
  3. Place caramels and milk into a microwave bowl and microwave for 2 minutes.
  4. Roll each apple with caramel sauce and place on sheet to set.

PS – You can use treats like nuts, cookies, etc. to add some extra flavor! (Always check for allergies before serving)

Checklist Place Mat

checklist
Table your constant stream of morning reminders with this clever place mat, which allows kids to take responsibility for their own must-dos.
Materials
  • Decorative paper
  • Scissors
  • Glue stick
  • 18- by 12-inch sheet of poster board
  • Markers
  • Clear Con-Tact paper (or have it laminated at a copy shop)
  • Nontoxic dry-erase marker
  • Adhesive-backed Velcro dot
Instructions
  1. Cut three 6- by 12-inch rectangles from decorative paper. Use a glue stick to affix them side by side onto the poster board.
  2. Write a “Do at Home” checklist on the left rectangle and a “Take to School” checklist on the right one (leave a few blank spaces at the bottom of each list for write-in reminders).
  3. Have the place mat laminated at a copy shop or cover it with clear Con-Tact paper. Your child can use a nontoxic dry-erase marker to check off items or write additional reminders. Affix an adhesive-backed Velcro dot to keep the marker in a handy spot on the mat.